Wednesday, February 25, 2015

A Custom Hard Case for Tenor Saxophone - Hotrodding the cheapo case.

I was getting ready to attend a seminar in France and began wondering how I would transport my tenor saxophone and clothing for 10 days.  I happened into my local Goodwill thrift store looking for an old hard sided suitcase.  Something like the old Samsonite or American Tourister thick plastic suitcases that I had seen there in the past.  It would require the next size larger than this suitcase.  One with a corner-to-corner dimension of about 30 inches and a depth of at least 8 inches.

I figured that my tenor saxophone could be made to fit inside the case with room left over for some clothing.  True, it would not be your standard saxophone flight case.  It would be more of a special circumstance "checked baggage" dual purpose hard shell flight case.

My idea was to make a custom foam "cocoon" for the horn, place it in the suitcase, and have enough extra room for clothing.  All of this had to be kept down to the airlines international checked baggage requirements for size (62 inches HxWxD) and just the right suitcase would make that possible.  I knew that my local Goodwill would be the best place to find a cheap cadaver for my experiment.  Goodwill had quite a selection.

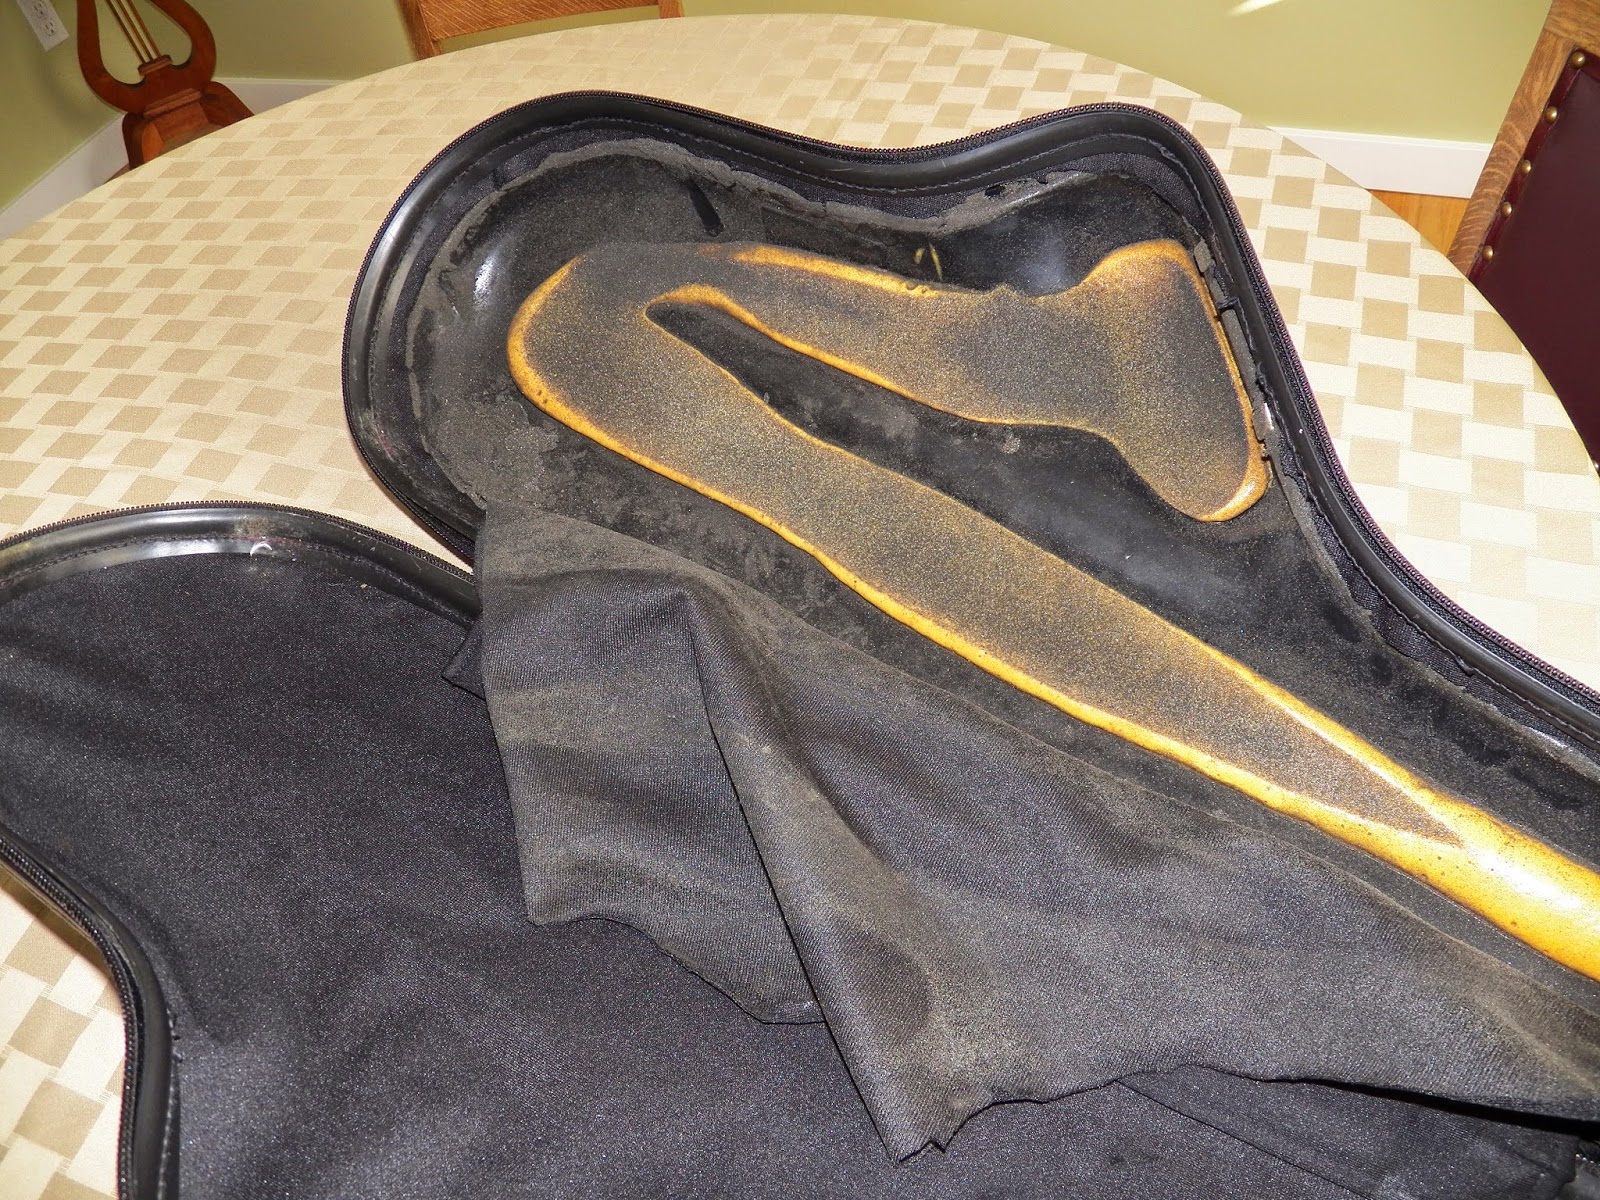
I was surprised to find among the suitcases a hard shell tenor saxophone case!!!.  It wasn't one of those high-end hard case.  In fact, it was a low-end super un-protective hard case.  


I don't know what the brand name is, but these are fairly common.  This one has a zipper around it instead of three or four latches, which I prefer, but other styles are available.  New, they are about $100 (there were some Chinese-made fiberglass cases being sold on Ebay for less, but I couldn't find them when I wrote this).  Because this one was used and at a thrift store, it was considerably cheaper.


When I took it to the cashier, I learned that because it was Tuesday(??), everything in the store was 20% off.  So I paid $5.60.  Not bad for my cadaver.  I later found a picture of this case from back in the day.  Check out the sax case on the cover of the Brecker Brothers Heavy Metal BeBop  from 1978.  

There are two reasons I called this case super un-protective.  First, it is designed to fit an imaginary generic saxophone (and was probably designed by somebody who had never held a saxophone).  That is very common with saxophone cases.  They tend to consist of a "saxophone-shaped hole" in which to place a variety of saxophones.  You can't really fault the manufacturers, as they are trying to meet a broad market.  Left hand bell keys, right hand bell keys, split bell keys, wide bell, narrow bell, vintage, new, etc. "One case to fit them all!"  Unfortunately, that doesn't work very well, and working well is the reason for getting a hard-sided flight case.  If you look at the picture above, you can see that this design has a bulge for both left and right bell keys, but the bulge is not actually shaped to fit any bell key guards that I have ever seen.

The second reason that this one is super un-protective is that the "padding" was kind of a joke.  There was a dribble of soft foam poured in and then covered by a foam-back cloth.  The two types of foam seemed to be incompatible and had both begun to crumble.


As with many sax cases, it is easy to see where the pressure points are when the case has the common "saxophone-shaped hole."  In this one, the material had worn through in a few places, generally at the rim of the bell, the thumb hook, the neck ring, and several other places, which indicates that the horn doesn't fit and moves around in the case, which means that it isn't really protected.

The hole in the cloth is where the saxophone rubbed against it.

What a wear point tells you, with any case, is that should the case be dropped there would be a pressure point at that spot.  If your case has a wear mark by the thumb hook, and you drop your case, guess where the most pressure is going to be applied?  It doesn't matter if the case has three inches of foam in some other area if the thumb hook or bell rim area is worn through so that it's touching the hard case.   I know this from having repaired bent thumb hooks and punched in body tubes damage that occurred when the case was dropped.  Here's a blog on how to make a generic vintage case more protective.

So how do I make sure that my precious baby is properly swaddled in my new case?  First, I tear out the old foam and cloth to get to the plastic shell, which is really the only thing of value on this old case (and also with many new cases).  The shell material seems okay, not too rigid/brittle and not to soft.  I know from other projects that spray or injected foam adds some strength to shells.  Certainly more than glued in pieces of sheet foam, the more common padding material.  Below is a picture of the shell cleaned out and ready to be modified to fit an actual saxophone.


I am making a case for my 1943 Martin Centennial tenor.  It has left hand bell keys, a long, narrow bell, and a long distance from the bell brace to the bow, a distinctive bell key guard, as well as other non-generic tenor features.  Although the Martin would fit in some of the expensive hard flight cases with generic saxophone-shaped holes, that's not good enough (and would cost me $300 more than my custom case).

The first thing that I did doesn't really relate to the custom interior.  I added a strap so that the case can't open 180 degrees as in the photos above.  I just didn't like the way it flopped open.  The new strap stops it at about 90 degrees.  


Now on to the custom interior.  I mummified my saxophone in thin plastic film, like Saran Wrap, to make sure that I couldn't get any foam on it.  I had to be careful how the wrapping was applied because the plastic film tended to smooth out the complex surface of the horn and that would result in something similar to the generic "saxophone-shaped hole" that I was trying to avoid.  On the other hand, even though I was making a custom case to fit a 1943 Martin tenor, and only a 1943 Martin tenor, I didn't want the horn to become encased in foam so that removal would be difficult.  So I wrapped the sax in plastic wrap and then stretched or cut the wrap in places where I wanted a really close fit (like around every key guard).


Above is my work area covered with plastic and the case masked so that I can minimize the foam getting on the zipper and causing problems.  I got some on the zipper anyway and it is only a cosmetic problem that I haven't bothered to completely clean up yet.  I decided to let the spilled foam wear off naturally.  It makes the exterior of the case look a little ratty, but that may be an advantage.  Give a thief the choice between a ratty case and a shiny new case and I think I know which will be stolen.


I used some scrap foam to ensure that the horn would be held at the right height when foamed in to place.


Here is a test positioning (prior to encasing the horn in plastic film) showing the foam stand offs.  Notice that the neck has a plug in it, which is required to make sure that you'll have enough room, and only enough room, to have a neck plug in the horn when using the case.  The "dry run" allows you to see what position will allow for maximum protection of a real live saxophone.


Here the horn, encased in plastic wrap, is also encased in the cloth material that will serve as the liner.  A bed of foam is then laid down.  I used Great Stuff "Window and Door" canned foam, about $6 per can at Home Depot.  The project took two cans (because I foamed it twice).  I used acetone to clean the applicator between foaming sessions so that I could use the one-time-only cans for several applications.


The horn is positioned in the uncured foam and any areas that aren't filled enough are touched up.  The foam keeps rising after it leaves the can, so it takes less than it appears at first squirt.  It also pushed the cloth up around keys, key guards, and between the bow and bell for maximum contact.  Do not use the regular Great Foam.  The expansion is too powerful and it continues to expand for about a week.  It will likely blow open your case.


The excess foam is then trimmed off and the cloth is laid down over the edges and tucked in.  A little shot of hot glue in a few places will keep it tucked in.

Here you can see the material that I used (faux snake skin) and something that I learned about foam.  Foam can migrate through cloth a little bit.  That's what the white blush on the material is.


It turned out that I didn't like the way the foam came through the material and the horn was positioned too high on that side of the case, meaning that it wasn't positioned evenly halfway in the case from top to bottom.  I tore it out and started over.  

For the next attempt, I used a black material commonly referred to as polar fleece.  It's often used in instrument cases (as in this blog about relining a vintage case).  It provides no padding (although it looks like it does) and is simply a covering for the custom foam.  It provides a little abrasion protection when the horn slides around in a generic saxophone-shaped hole, but that won't be necessary with this case.

The other thing my first attempt taught me is that bonding the cloth to the foam during a single step is an unnecessary complication.  Were I to do it over, I would wrap the horn in a sheet of polyester film (aka, visqueen) and foam it.  Then use either spray adhesive or the hot glue gun to attach the fabric to the protective plastic that remains lining your custom indentation in the foam.  The fabric lining doesn't (or shouldn't) get pulled on, so just "tacking" it in place after foaming would be sufficient. 

As you might imagine, taking pictures while working with foam is a little complicated.  That's why I'm missing the next step.  Once the new cloth material was used on one side of the case, the other side needed to be foamed.  I made foam stand offs again, shot foam in the case, laid down the material,* put the horn on top, closed the case, and held it shut with straps.  Then I waited 8 hours to see what I had.  There were a few places that need touching up with additional foam before the material could be tucked in around the edges. 
*Were I to do it again, I would have just used the plastic film, as noted above.  Using the cloth complicated things more than necessary.

 The "custom fit" aspect of the case is interesting.  Because of the way it was foamed, the areas around the horn, i.e., between the horn and the edge of the case, are not perfectly flat.  That area is not always in the same plane as the zipper, as with sax cases that have a "generic saxophone-shaped hole."  Some spots are high and some are low, but the opposite side of the case has corresponding highs and lows because it was later foamed to fit both the sax and the other side of the case, so the custom foam sides interlock. 

Areas like the thumb hook have their own little custom indentation, with the foam and cloth lining then coming up against the body tube, or surrounding a key guard.  The cloth I ended up using is quite slippery, which is good, because the horn has to be wiggled in and out of its position.  Most notably is the bell, which has to be just right for the case to close.


Photos of black material are difficult, as I found in a prior blog about saxophone cases, but if you click on the picture, you can see that the entire bell is completely and evenly supported by the foam, including a little going inside the bell.  The foam is form fitting halfway up the side of the bell on the left of the picture and comes up almost to the bell brace between the bell and the body.  The other half of the case, when closed, does the same and the entire horn is essentially clamped into place with foam.  Although the bell is only 3/4 of an inch away from the side, getting the horn to move that 3/4 of an inch would require a deformation of basically the entire horn (or the entire hard case), which can happen under extreme conditions.  Of course under extreme conditions, as noted in the video, not even a case would matter.

Other areas of the saxophone are likewise evenly supported by the custom foam.
You can see the imprint of the wire key guard, the bulging of the foam between the bell and the body tube, as well as the contours of the palm keys in the custom case.

You can see a "V" shaped indentation matching the Centennial's unique bell key guards opposite the bell key guards in the top two pictures.  Every key guard fits in its own custom place.  Even the keys and posts are supported.  The idea is to spread any point loads as wide as possible.  A generic saxophone-shaped hole can protect the horn once enough foam has collapsed at the point loads.  I'm just looking to spread the point loads and eliminate excess and ineffective foam.  

The downside is that this case fits only a 1942-43 Martin Centennial tenor, but that's okay.  I don't intend to keep it when I sell the horn, as I might with a hard shell case that has a generic saxophone-shaped hole.  The form-fitting nature of the case requires that the neck and the mouthpiece and the neck strap be put down the bell.  That's not a problem since I had enough extra lining material to make some padded bags.  I've also gotten used to this method with some of my other cases and have never had a problem.  Plus, I tend to take an over-the-shoulder bag for music, stand, etc., so I have room elsewhere and I can keep the size of the sax case to a minimum.


My custom hard case weighs 4 pounds 4 ounces (1.9 kg), 11.5 pounds with the horn, mouthpiece, and neck strap (5.2 kg).  Most people would think that it is an alto hard case because it is a lot smaller than generic hard-sided tenor flight cases and considerably smaller than stuff that I see people lugging on to a flight as carry-on baggage.  I shouldn't have any problem using this as carry-on, allowing me to just use a regular checked suitcase for my clothing.  I won't be able to test that for a couple of months.  But I can test other aspects of my new case.

So, how protective is it?  Only one way to find out.


When I first play tested the horn, I thought that I had ruined my Martin.  It sounded just like a Selmer.  But then I remembered that I had put a spare mouthpiece down the bell.  Once I removed the obstruction, it sounded perfect again.

Update:  I have had no trouble taking this as carry-on luggage on several local and international flights.  I was told at one point that I could take it aboard because it was an alto.  Who am I to disagree?  I also feel better taking this to the airport because, if I do have to check it, I know it won't be bouncing around inside of a generic case.

Tuesday, February 17, 2015

Another Saxophone Leak that a Light Can't Detect.

I wrote a prior blog about using air for leak detection rather than the usual leak light.  I now use the leak light to chase down leaks, but to do overall testing, and to find leaks that go undetected with a light, I'm using the air suction test as my initial check.

I just found another leak that would have gone undetected had I not used a suction test.  I know that's the case because the person I purchased the horn from, as well as the technician(s) that worked on the horn had not figured out that there was an odd leak.

When UPS delivered the horn, a 1955 Buescher Aristocrat, I unpacked it and took it for a test toot.  I immediately noticed that there was something odd.  The low end seemed weak, 2nd D was stuffy, and the key heights on the lower stack were extremely high.  The pads looked new, but something wasn't sealing.  These horns have a great reputation and I was expecting something on par with my Martin tenor.

As per the prior post, I put plastic wrap over the bell, fingered low Bb, and slowly inhaled through the neck.  The plastic wrap could be sucked in, but I could basically breath through the horn almost like one of the pip vents was open.  And I could hear a hissing sound.  Something was really wrong for a horn that had new pads and recent servicing.

Starting at the neck, as in the prior blog, I sealed off the neck tenon, and sucked.  I could hear a distinct hiss, so I put pressure on the octave pip pad to make sure that it was sealing.  That wasn't the problem.  I looked closely at the neck cork for any weird splits.  Nope.  I had a Martin that had a pinhole leak in the tenon solder, but that wasn't the case here.

I could see that the neck brace, which is soldered up against the underside of the neck, had a little split in it.  I could also reach in through the tenon just far enough to feel a ridge or split on the inside of the neck.  So I put soapy water on the neck and blew air into it.  It was like a kid's bubble pipe.  You can hit the "full screen" icon to view this video.  


The leak created a tiny "ghost vent" right between the upper and lower pips.  It was always open, which caused several odd things that weren't immediately apparent (the prior owner gigged with this horn, so it is possible to "practice, practice, practice" and live with the problem).  Here is a picture of the tiny split along only one side of the brace.  It was about an inch (2.5cm) long.


You can see that the neck has plenty of tiny dents and the lacquer is not great (about the same as the rest of the horn).  The neck tenon was a perfect fit, which on a 1955 horn means that it was probably adjusted at some point. I suspect that the neck received a sharp knock of the kind that "shocks" a solder joint open.  Closer examination of the neck showed that it was slightly out of round and the tiny dents may have been the result of somebody putting the neck back closer to round.  Don't know.  That's when the neck tenon may have been adjusted back to perfect. What they didn't do, clearly, is check that the neck still sealed.  

The horn had a stuffy 2nd D, a common indication of a leak, but this leak was high enough on the horn so that it really affected the entire horn.  The horn had a "spread" sound common to vintage American saxophones, but that was in part because the tiny ghost vent was adding high partials to the entire lower register.  In fact, the lower stack keys were the the highest that I had ever seen.  Really open pads flattens the notes and tends to keep the low end from "jumping register" (because the ghost vent is like pressing the octave key a tiny bit).  

I first sealed up the leak using some sticky clay stuff commonly called "blue tack," although mine isn't blue.  This showed me that the leak was in fact causing some problems.  It also showed me that the neck leak wasn't the only problem.  More on the other problems in another blog.


Once the leak was fixed, I actually doubled the thickness of the lower stack corks to reduce the heights.  It had 1/32nd inch thick cork of the key feet.  I put on 1/16th inch thick cork, which lowered the pads about 1/8th of an inch.  That's a huge difference.  It makes the lower stack feel much quicker (maybe it is) and it tunes just fine.

Probably the worst thing a little leak does is that it sucks power out of the horn.  You can mess with key heights for intonation issues and you can get some more power out of the horn by maximizing pad heights, but there's only so much that can be done if there's a little leak high on the horn.

Since this wasn't a pristine horn, I had a go at resoldering the neck brace.  I was hoping that there would be enough solder already in place that, once fluxed (using a needle to apply), heat would be all that was necessary.  I had some solder handy just in case that didn't happen.  And it didn't.  I had to add a touch of solder.  Careful as I was, it shows a little outside of the brace.  
Once the solder tarnishes a little, it was disappear, as it will be camouflaged by the general condition of the vintage horn.

I could have taken this to a specialist to completely remove the brace, reshape the neck better (maybe), and re-solder the neck seam before re-installing the brace.  I could also pay to have the neck really cleaned up and re-lacquered.  It would cost me about 50% of what I paid for the horn and it would be so pretty that it wouldn't match the funky finish on the horn.  No thanks.  I'm happy with a player. 

After chasing down more "common" leaks on the pads (and this was horn that was just "serviced"), this Buescher tenor was back in business.  I wrote another blog about the other leaks that I found because the knowledge should be standard operating procedure for DIY horn tinkerers and, just as important, players should know what to look for when buying or getting a horn back from their tech.  In the meantime, what a nice difference the "suck" method of leak detection provided for this old horn.

Wednesday, November 19, 2014

Removing a Saxophone Neck Dent

There are three requirements for removing a dent in a saxophone neck.  The first is proper tools.  The second is proper technique.  The third is common sense.  I'm going to concentrate on the first two.  By proper tools, I don't necessarily mean tools that are specifically made for horn dent removal (tool N81 is the "official" version of what I'm going to do).  Those would be nice, but we are going to use things that are readily available to the common man using common sense.   

Here's my project.  This is a vintage alto neck that has suffered a dent.  It is a fairly sharp crease.  Probably more a cosmetic issue than an intonation issue, but you never know.  Best to have it removed without creating any further damage.  That last part is always important.  
  The picture was taken with a low sun angle that highlights the dent.  It isn't quite as noticeable under most lighting situations.

Next to the neck is the first tool that I used.  It is actually a bar from an old motorcycle tool kit.  This was the bar that went through the spark plug socket to allow removal and replacement of the spark plug.  This type of bar is fairly common.  It is probably about 8mm thick and has a 90 degree bend in it.  I have added a little bend on the opposite end by placing in in my vice and adding a bend to the other end.  

The amount of bend that I've added is kind of important.  What I'm shooting for is to bend it enough so that it is out of plumb a little more than the inside diameter at the point of the dent.  It can't have too much bend or else it won't fit down the neck opening.  I then insert it down the neck in the direction shown in the picture and feel for the dent with the end.  The tip is against the dent, the straight section is against the opposite side of the neck, and I twist the 90 degree section to "wipe out" the dent.  Here's a crude picture of what I'm doing.

When removing the dent, make sure that the pressure against point A is spread out enough that you don't deform the opposite side of the neck.  The force on the dent should be a point load and the force on the opposite wall should be spread out.  This tool works great for quickly removing dimples.

This dent was kind of a sharp crease.  Those are the hardest to remove and the hardest to make completely disappear.  I could push it out a little with my tool, but complete removal was taking too much pressure.  Be very careful, start with a tiny amount of effort and slowly increase the pressure.  If you go too far and push a bulge out, you can push it back, but best not to go there.  When I got sufficiently spooked about trying for complete removal with my bar, I switched tactics.  

 
The above picture shows my initial results after using my "new" tool, a "dent chaser."
Here's another picture of the tool.  It's a home-made dent chaser using regular wrench sockets.  Here's the way it works.  First I find two little sockets that will pass all the way through the neck.  Then I find one socket that won't quite pass the dented area.  I thread the larger one and tie the other two to the ends of the twine.  I drop a small socket though from the tenon end and then use the twine to pull the larger socket up against the dent from the tenon end.  I carefully pull it under the dent, forcing the dent out from the inside, but, because of the snug fit, not deforming the neck on any other side (i.e., again a point load on the dent and a spread load on the opposite wall).

I need the smaller sockets on both ends to pull the chaser in to the damaged area and to make sure that I can get it back out.  Make sure that your string or twine is up to the task (maybe 50 lb test or more).  

If I'm lucky, I can find another socket that's slightly larger and repeat the process.  The largest I could use on this neck happened to be a 12mm socket.  Different brands of sockets have different diameters.  Different horns and different areas of the neck will require different sockets.  A large tool supply is needed although, as we have seen, they don't have to be "horn dent" specific tools.  I'm sure that there are other common items that can be substituted for sockets.

Not shown is what I did when the first socket was lodged in place behind the dent.  This type of dent creates kind of a "smile" with the edges of the dent actually higher than the undamaged surrounding metal.  So although it is dented down in the center, the creases on both sides are often proud of the neck tube and the hardest part to remove completely.  As I slowly work the socket in to remove the dent, I tap down on the dent end creases using a resin mallet.  Something like a piece of hardwood could also work.  Anything that doesn't damage the finish and allows the dent to be worked out.  I repeated that when I used a second, slightly larger, socket.
Here is the result with the harsh sun light showing the repaired dent at it's worst.   It is basically invisible for all practical purposes.  And this is still the biggest dent on this 1926 horn.

Monday, September 29, 2014

Refacing a vintage hard rubber saxophone mouthpiece

You may have seen my blog where I refaced a modern plastic Selmer Goldentone piece.  That was just for jollies.  What I like doing is refacing the common hard rubber pieces.  Preferably, a hard rubber piece that either has no brand name on it or has a brand name that isn't popular.  Bundy comes to mind and is a perfect example of what I look for.  George M. Bundy was the president of Selmer U.S.A. for many years (1918-1951).  He had horns and mouthpieces stenciled for his company.  Both Conn and Buescher made saxophones that carried the Bundy name, and those horns sell for far less than the "official" Conn and Bueschers.  (Beginning in the 1950's, Bundy apparently began making some of its own saxophones in house). 

Mr. Bundy's pursuit of quality instruments is shown by who he hired.  For instance, for his flute production he employed George Haynes (who patented the rolled tone holes used by Conn and others) and he later hired Kurt Gemeinhardt, both well known flute designers who later produced their own line of flutes.  When Selmer Paris re-acquired Selmer U.S.A. after Mr. Bundy's death and later purchased Buescher, Selmer decided to use the Bundy name on it's "second line" or "student" horns and accessories.  Production quality dropped, and the Bundy name became synonymous with crappy horns.  But if the item is a "real Bundy" from the days when Mr. Bundy ran the business, it is likely a quality piece.  

The brand name "Vito" has been through a similar loss of reputation.  Dr. Vito Pascucci ran Leblanc U.S.A.  In addition to importing Leblanc instruments from France, he also purchased stenciled instruments and accessories for the "Vito" or "second line" instruments, many of them also top quality, as was the case with Beaugnier sourced Vito saxophones.  After his death, the reputation that he had built, i.e., his trade name "Vito," was used to sell inferior products.  

Too bad for the legacies of Mssrs. Bundy and Pascucci.  But good news for us.  The Bundy and Vito names are on some very nice vintage and not-so-vintage mouthpieces produced for them by Riffault, JJ Babbitt, and other producers of fine mouthpieces.  In many instances, these mouthpiece producers also made the "big name" pieces for mouthpiece finishing businesses.  If a blank is good enough for Brilhart, Dukoff, Link, WoodWind Co., or Penzel-Mueller, it's good enough for us (even if it is stamped with the name Bundy, Riffault, Coast, some other obscure name, or no name at all).

The piece that I'm going to reface is badged "Selmer Elkhart - New York." Selmer USA began in New York, where it was operated by Mr. Bundy, and later moved its production facilities to Elkhart.  It kept a New York facility until 1951, but I don't know if "Elkhart-New York" means that my piece was made prior to 1951.  The reason I say that is because in a later 1956 catalog, the Selmer USA mouthpieces (made in the USA by JJ Babbitt) were simply called "Selmer Elkhart," so my Selmer "Elkhart - New York" piece may be from prior to 1951.  

Click on the picture below to see the 1956 pricing.  They are worth three times the original sale price today, although sometimes sellers ask for 30 times the original price by claiming that the pieces are really a "Dukoff blank."  There is no such thing as a Dukoff blank.  I'll say that again.  There is no such thing as a Dukoff blank.  


A vintage Selmer Elkhart - New York mouthpiece, like a hard rubber Dukoff piece, has a large chamber.  It is actually a chamber that was used by Babbitt on various mouthpieces made prior to the Selmer Elkhart - New York and the Dukoff hard rubber pieces.  These older mouthpieces are never claimed to be Dukoff blanks or Dukoff Zimberoff (DZ) clones because they have different exterior shapes from the Dukoff.  
Hmmmm.  Once again, we are faced with the issue of what controls the sound produced by a mouthpiece, the interior shape or the exterior name?  I am of the opinion that it is the interior shape.  Therefore, a DZ style of mouthpiece can be made either from one of the four or five Babbitt blanks that look like Dukoff mouthpieces (on both the exterior and interior), or from more than a half a dozen Babbitt blanks that have the identical interior chamber but different exterior shapes and names.  (The same goes for vintage Brilhart, Link, WWCo., etc. if you believe that it is the chamber shape that controls sound).  

The only problem is that if we use a blank that has an identical chamber but a different exterior shape, then our pathetic pedigree claim would have to be "it's just like a Dukoff Zimberoff Supersonic on the inside."  We saw this problem with comparing the Porche 356 coupe with the 356 cabriolet in a prior blog.  Sure, the Porches are identical on the inside and from a performance point of view, but the really big money is paid by the people who are concerned about the exterior, i.e., about how it looks.

But back to my project. Here is a picture of the generic student Babbitt blank labeled as a Selmer Elkhart - New York #3.  It is the same one that was shown in a prior blog where it was compared to a Dukoff Zimberoff piece, since Dukoff sometimes finished this particular JJ Babbitt blank and offered it as its hard rubber alto mouthpiece. 


 You can see the giant nick in the the middle of the right rail.  That's not a problem here because the new facing curve will take care of it.  The original tip opening is about a .060, which is considered very small by today's standards even for a student tenor piece (a new Selmer Goldentone 3, now the king of student mouthpieces, is .066).  With a hard reed, the stock Selmer Elkhart - New York produces a sound that blends well with the woodwind section (it's intended purpose).

As we noticed in the blog about using this blank to mimic a Dukoff Zimberoff, the DZ had less material on the butt end of the table, thereby altering the angle of the entire chamber to the neck of the saxophone.  I'm going to do the same here, for two reasons.  First, it does tend to brighten the piece a bit (which makes it not blend as well with a traditional woodwind section).  Second, and just as important, it opens the tip without removing material from the tip.  This piece has almost enough tip material so that I won't shorten the piece excessively by the new facing lay, but a "butt cut" to the table lay will make sure that it is shortened very little, if at all, by a new facing.  By not removing too much material from the tip, I also have more material to work with when forming a baffle.

The "before" butt showing the original "denim" look milling pattern.
So here goes.


A couple of things to notice in the above picture.  I'm using 100 grit aluminum oxide paper.  That is considered extremely aggressive grit for mouthpiece work.  Notice, however, that the leading edge of the sandpaper (below my thumb) would be about at the window opening on the piece.  In other words, I'm not touching the paper to the curvature or lay of the piece, I'm only altering the table in relationship to the original lay.  

The lay of the piece, i.e., the rails and tip, have a fraction of the amount of material as does the entire table area.  If I use course grit paper on the rails and tip, I'll quickly open the piece too much.  If I used a fine grit paper on the table, it would take hours to remove the amount of material I need to remove (<1 mm at the butt end).  I'm using a course grit very carefully.

I don't really need to emphasize the pressure on the back of the table too much to reduce the table at the back (the butt cut) .  Since the back of the table travels much further across the sandpaper, simply using even strokes cants the slope towards the back.  The table is then finish-leveled using finer grit paper (which tends to bring the tip opening back down a bit, but not much).  I ended up with a tip opening of about .078 before even touching the tip and rails.  

You can play the mouthpiece at this stage, and it can be very instructive to try it.  Most likely, the curvature lay will be extremely short for the increased tip opening and it will have a very pronounced "take off" point where the curvature lay leaves the flat table.  A soft low note will be impossible.  Resistance throughout the scale will be very high.  This is the point at which you will be convinced that you have ruined the mouthpiece.  Good thing that you didn't fall for the "It's a Dukoff blank" scam and paid $80 for the piece.  You only paid $12 for it, right?

I can't find my notes on what the length of the lay was originally on this piece, but it really doesn't matter.  What matters is that when I'm leveling up my new table surface I end up with a "take off" point where the lay curvature leaves the flat table (usually measured with the .0015" feeler gauge) that is less than my intended finished take off point for my new lay.  

Let's say that my original tip opening was .060 and the .0015 feeler gauge read 42 (in Brand numbers).  I'm going to call 42 my take off point (even though the actual point at which the curvature lay leaves the table lay is further back from the tip).  Let's say that I'm shooting for a .085 tip opening on the refaced piece.  A .085 tip opening typically has a take off point above 44.  So as I do my fine tuning on leveling the butt cut on the table, and I get a take off point below 44, I'm ready to go.  

Keep in mind that you also need to keep your butt cut level from side to side.  If you tip the table a little while butt cutting the table, you will have different Brand numbers down the left and right rails and have to correct the entire way when putting on the new curvature lay.  You will also have to rework the baffle to even it out.  Better to avoid this.

I hope you can see that the rear of the table was shaved down compared to the original table.

Original.   


Here is my new table with the butt cut.


Next, I put on the facing curve.  I can either use the one on my old Dukoff "Fluted Chamber" or I can use a Meyer, Link, etc. curve.  I'm not claiming to create a Dukoff Zimberoff Knockoff or "DZK" so I'm going to use something closer to a vintage Meyer 8 (most of which were also made from JJ Babbit blanks).  The baffle I'll shape more like the Dukoff, but with a little bit of a two-stage baffle.  Hard to describe and even harder to photo.  I spent 45 minutes trying to get a baffle picture and haven't gotten it yet.  So I'll just skip to how I compare baffle shapes.


I use a cotton swab with a little olive oil on it.  I apply a thin layer of olive oil to the chamber.  Then, using a single source light (like a single LED), I can sight through the chamber and really get a good look at the shape of the chamber by examining the reflections.  (For a quick look, soapy water can do the same thing.) 

Here, my calculator served as my pedestal when I attempted to photograph the reflection.  You can get the general idea, but normally I just hold it to the light and inspect the shape of the chamber.  Very simple.  


My experience is that Dukoff rubber pieces tend to have an almost straight baffle down through the chamber with just a slight divot (when viewed as above) about halfway down (or right in the middle of the reflection above).  That's the part that I couldn't get to photograph, i.e., the fine details of the chamber shape that can be used for comparison.

Don't be confused by my use of the term "straight" baffle. That area of the chamber is also "domed" when thinking of it as a chamber (with the table facing down).  With the table facing down, maybe think of a stairwell that has a domed ceiling.  The ceiling height above the stairs increases slightly at the middle of the flight and then goes back to it's original height at the " second landing" (the neck bore).


The baffle right at the tip is almost a flat plane.  However, as the "domed stairwell" part of the chamber starts, it creates what is sometimes called a "clam shell" baffle that is prominent on the Dukoff Zimberoffs.  Unfortunately, I couldn't get a picture of mine.  Here's the real deal, although I don't know if the photographer was actually trying to get the DZ baffle, but it is a great picture.  This reflection is a little misleading because of the "V" look to the reflection in the first picture.  Looking through from the shank, as above, would show that the domed chamber that creates the curved reflection at the top actually goes almost all the way to the neck bore.


 By contrast, a Link Tone Edge chamber is flatter side to side and, therefore, the drop off from the baffle is closer to a straight line reflection (or follows the curvature of the tip, whereas the drop off for the DZ is always more exaggerated than the curvature of the tip).  Using the above stair analogy, a vintage Tone Edge has a flatter "coved" ceiling on the stairwell with the small increase in height right at the top of the flight which returns to normal right at the landing.  I'd be amazed if anybody is following this.  I'd do another blog, but getting photos is a pain, as would be creating diagrams with arrows.

My baffle shape is a little different from a DZK in that it is sort of two-stage.  The "first stage" is shown in the reflection.  The baffle angle then increases again and the clam-shell effect is really prominent only on the "second stage."  This secret process increases the tonal vibrosity by altering the nodal pulsations through impedance re-alignment.  Nah, I just made that up.  I do it because it's quick and easy.  Here's what it looks like. This picture just shows the first drop off, which follows the tip curve.  Only the second drop off has the "clam shell" look (which doesn't look like any clam shell I've ever seen).


As I put the curve on, I test the mouthpiece when I get close to my goal.  In this case, I had to decide whether I would really improve the piece by using some old numbers that somebody else had copied from a Meyer 8.  I'm guessing that those numbers were never etched on a stone tablet.  I've always assumed that curvature lays varied a little.  It makes sense because the tip openings aren't absolutely accurate on the best of pieces.  A case in point would be vintage Berg Larsen pieces, where tip openings can vary a lot from the manufacturer's claimed tip openings.  Yet, when a person finds the right Berg, they don't care if the tip is off by .004 when compared to an "official" chart? (I had a Berg tenor piece that's off by .007 narrower).


I was happy with my curve and then measured the tip at .083.  It might not blow great for other players or maybe on some horns or, who knows, for some altissimmo notes outside of my range (which is basically all of them).  Tant pis.  I was just looking to make a zippy little mouthpiece for my Kohlert 57 alto.  Mission accomplished.

Here is another blog on fixing up an old vintage piece that was basically ruined by somebody trying to change the facing.