

I know what you're thinking. Selmer Goldentone! Those are plastic student pieces that sell for $20. That's not worth messing with. Well, let's just use this as a test case.
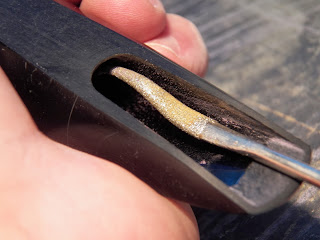
The first thing to notice in the picture is the amount of "meat" there is on that tip. It's over a millimeter thick, so there is plenty of material to work with. The tip opening on these pieces (this is a #3 and I doubt that Selmer even makes any other facing) is tight, only .066 of an inch (1.68mm).
 Feeler gauges don't fit.
 Feeler gauges do fit under the tip at .066. That's our tip opening.
There is the complex method of measuring tip openings for people who like to push buttons and change batteries. I've never found it to be all that much better, in fact the digital readout to ten-thousandth of an inch is as dubious as it is unnecessary.
Here's what I use. These depth gauges are available as "tire tread" gauges for under $4 (search "digital tread depth" on Ebay). You can find somebody who will gladly sell you the same thing as an "official mouthpiece gauge" for $50-100 because they claim that it is an "official mouthpiece gauge." As you will see in a moment, the tip opening is the least important measurement on a mouthpiece (almost of no importance), but it continues to get a lot of attention. It is actually about as important, from a performance perspective, as the color of a car.
Here's what I use. These depth gauges are available as "tire tread" gauges for under $4 (search "digital tread depth" on Ebay). You can find somebody who will gladly sell you the same thing as an "official mouthpiece gauge" for $50-100 because they claim that it is an "official mouthpiece gauge." As you will see in a moment, the tip opening is the least important measurement on a mouthpiece (almost of no importance), but it continues to get a lot of attention. It is actually about as important, from a performance perspective, as the color of a car.
 First, you zero out the depth gauge. Here, I'm using my glass ruler on the glass topped workbench.
 Then, you measure the tip opening as it overhangs the glass ruler. It reads .066", same as with using the feeler gauges. It isn't any faster or more accurate, but it looks more "professional." Notice that the measuring tip has been rounded off to give me a more accurate reading.
  Just for fun, I measured the chipped area. .0685", so it's still a very small tip opening on a tenor even if we open it enough to remove the damage.
I went ahead and mapped out the original lay. I normally would skip this step, unless I was really curious on a pristine example on a nice-playing vintage piece and wanted the information for my files (and wanted to try the same lay on other pieces). I mapped this Goldentone just to show you what a $20 student piece lay looks like. Keep in mind, this piece plays even with the chip. A scratch on the side rail can stop a piece from playing, but a nick on the tip rail usually doesn't. Try this for yourself. Put your reed on so that it's barely just short of the tip rail. Most will still play, although stuffy. This Goldentone plays, but not well and with no personality.
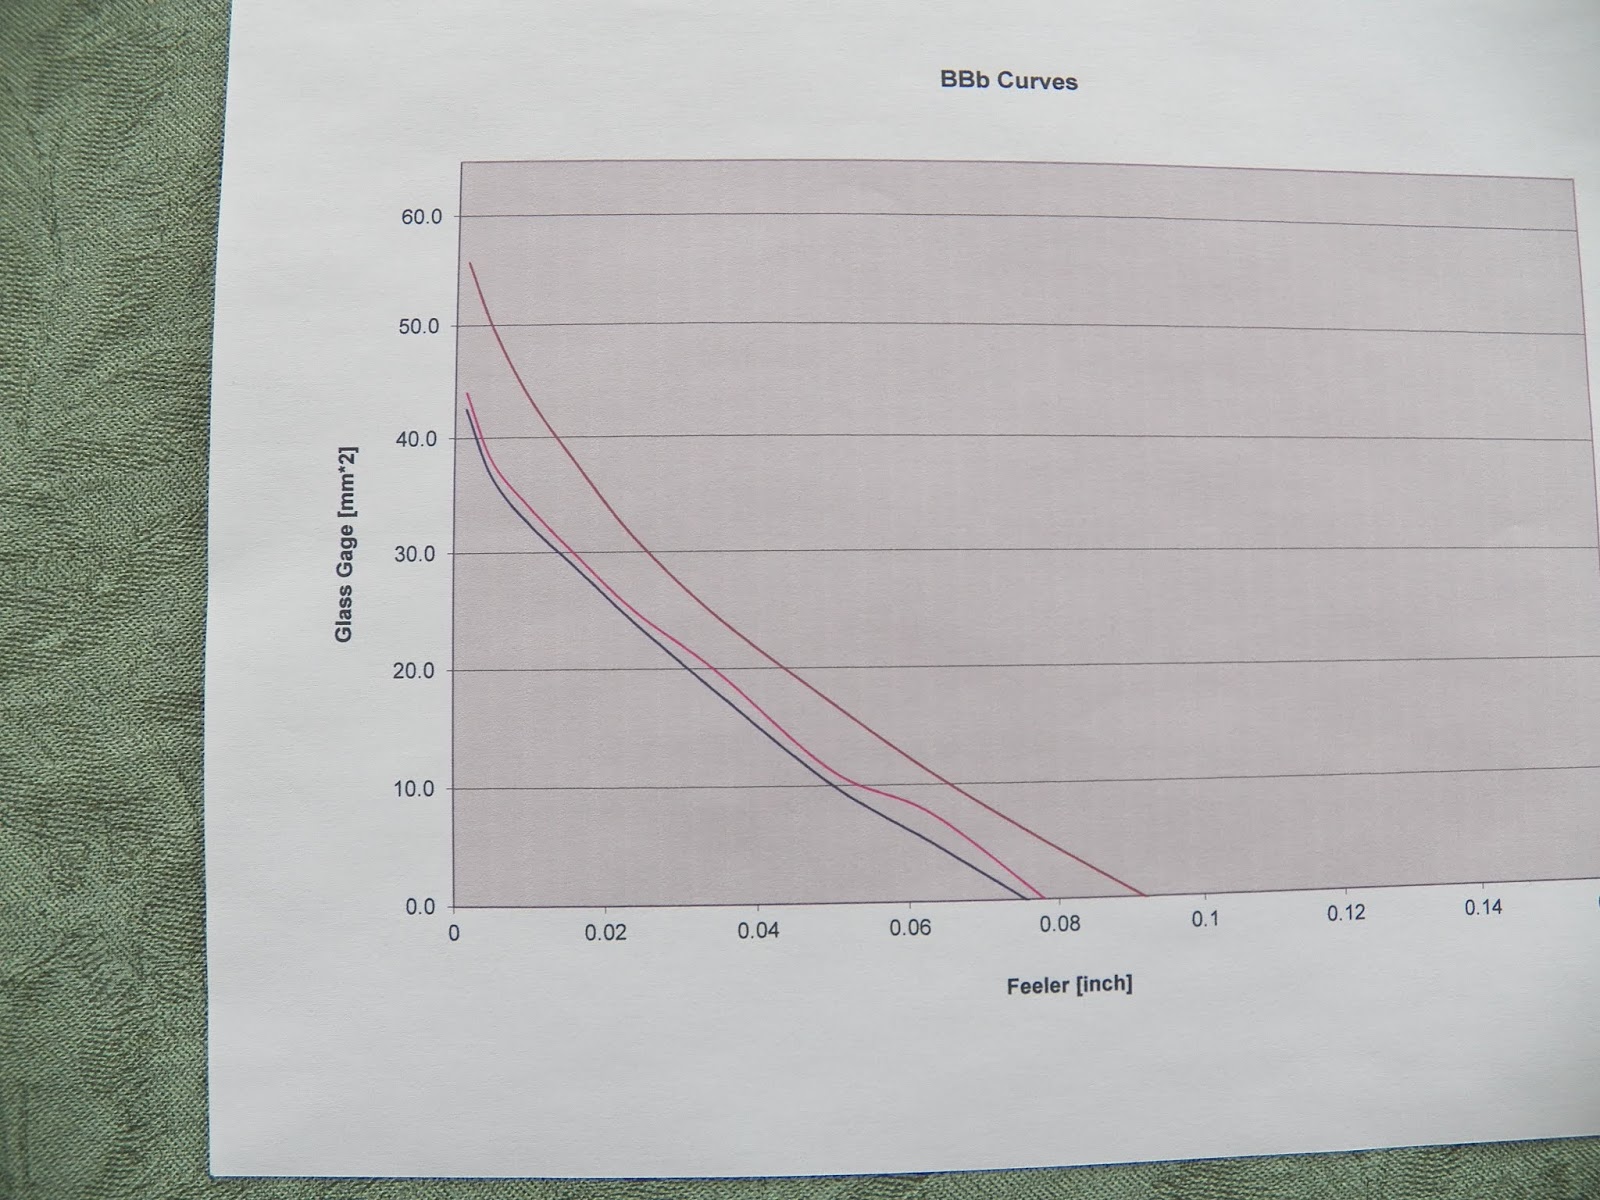
I mapped it as shown in the Mapping a Mouthpiece blog and printed out this graph. The smooth brown line is kind of a generic 7* Link tenor curve. The other two lines are the left and right rails of the Goldentone.
.jpg)
You can see that the rails are not even as they leave the table (shown on the upper left side of the graph). When I measured with the .0015" feeler gauge, I got a Brand number of 49.1 for one side and 45 for the other. Both are long for this small of a tip opening. And the difference in facing length means that the reed will be canted towards one side. That's going to "add resistance," and probably not in a good way.
The further measurements for the curvature on the rails actually cross at the flat center, and then split apart again at the tip. That means that the rails actually tip one direction at the table and then the other way at the tip. Reeds really don't like to do that. I often wonder if this is the problem with those players who find only "one good reed" in a box of 10. Are they searching for an abnormal or warped reed that can flex to fit a goofy curve on their mouthpiece? The "one good reed" could actually be the worst one in the box.
Here is graph of another student mouthpiece (contrabass clarinet) that I measured. You can see why a cheap student mouthpiece tends to play like a cheap student mouthpiece.
Even with the asymmetrical curvature issues and the flat center, these are fairly typical student curves. Longer, flatter, and smaller tip openings than a "professional" or "custom" mouthpiece (hopefully). My goal is to make a professional custom mouthpiece out of a damaged Selmer Goldtone. I've got my work cut out for me.
The first thing I need to do is check whether the table is flat. It could be that a warped table is what is causing my extremely large Brand number differences where the curve leaves the table. I take a couple of swipes across 1500 grit sandpaper just to see where the paper scuffs up the original milling marks on the table. My bench has a plate-glass top and that is what I consider flat.

 You can see that the table is slightly convex right in the middle. This is fairly common. (Here is the same thing on an old Rico "Gregory" mouthpiece blank at picture #11).
It would be possible for air to leak out of the top of the window and through the convex table. But that's actually okay for my project. In fact, that's good. Remember how uneven from side-to-side that my rails are? Now it's possible to bring them more in line with each other as I level the table using the sandpaper. I press slightly more towards the tip on the side with the longer Brand number. A big change in the "jump off point" from the table to the lay hardly affects the tip opening (which is already uneven, so no problem).
 I had crumpled up this chart and threw it away before I decided to write this blog. That's why it is all wrinkled up.
The first column is the original curve. The rest of the columns are sort of in an arrangement that works for me but is difficult to explain, so I won't. But I start out with a left rail Brand number of 49.1 (i.e., the .0015" feeler gauge slips in to 24.5 mm from the tip), which is way too long of a lay for this tip opening. It is even too long for my intended final tip opening (unless you like long lays, which I do, but that's not covered in this blog). After flattening the table (second measurement column), I had the starting point even, but at a long Brand number of 48 (24 mm). Now that the take off point was even, I could proceed with continuing to flatten the table and shorten the lay.
 Getting the table closer to flat. You can see that my emphasis has been towards the front of the table to get the take-off point even.
 Finally flat.
Once I've got the table flat, I'm really ready to begin. As part of leveling the table, I moved the Brand numbers for the .0015 feeler (the "start" of the facing) down to about 45 (22.5mm), which is now workable for my intended tip opening. It also brought the first couple of measurements down so that, when re-graphing the rail lines, all of the measurements are now underneath my "generic 7*" curve. That means that I can carefully refinish that area to match the curve shown on the graph above.
This first part of measuring the full curve was mainly to show what I might do with a mouthpiece that was already very close to what I wanted. This piece isn't, so I'm going to depart a little from a normally careful tune-up process.

That's 100 grit sandpaper. I'm going to take a few swipes on it. I have too much material to remove to mess around by beginning with something like 320 grit. But check your initial lay numbers before you begin! I have to stay away from where the lay begins, as removing small amounts of material there has a huge effect. If I inadvertently remove too much material from the rails, I would have to go back and really remove a lot of material from the table to get back to something around 45 with the .0015 feeler. If you look at the graph, you can see that I basically need to stay away from the first third of the lay and mainly concentrate on the tip for now.

That's what the tip looks like after a couple of swipes on the 100 grit. You can still see just a dimple remaining of the chipped spot just left of middle. 100 grit was taking away more than .001" per swipe. Careful with that axe, Eugene (open in a separate window for some musical accompaniment appropriate for mouthpiece refacing, including applause at the end when you get things perfect).
 Even with the chipped spot no longer showing on the tip rail, there is still plenty of material at the beak.
The above picture is just to show the difference between a plastic piece and a hard rubber piece. Hard rubber leaves a light brown powder shown at the top of the picture (from another piece that I was working on). Black plastic usually leaves a purple residue (shown at the bottom) and white plastic is just white. Hard rubber is nicer to work on, in my opinion. Other than that, there is no evidence that mouthpiece material affects how a piece plays or sounds. But maybe it's a situation like the Princess and the Pea. I can't hear or feel the difference, but a true mouthpiece princess can. And there are plenty of mouthpiece princesses. Material also matters if you are selling mouthpieces made from a certain material. That material is always the best.
 Using a mechanic's ruler marked in .5 mm increments (i.e., Brand numbers). It can be flipped over to have the .5 mm markings on the other side. The mouthpiece is simply lined up evenly on the other side. Sometimes you can't see it, but it is there and the measurement is as accurate as with a glass ruler.
I've been measuring as I go along. I just thought that you should know. I constantly refer to my computer generated graph of the "generic 7*" curve that I am working towards. I tend to work from the table towards the tip and try to keep at least two measurements in mind at a time.
For example, let's say I'm working to get the .0015 feeler gauge shown above to the 31mm mark (which would be a Brand number of 62!!! and only encountered when working on a contrabass clarinet mouthpiece). Before I remove any material at that point, I would also check with the next thicker gauge (.005) to make sure that it is okay to remove material further out on the curve. In other words, I don't want to pay so much attention to the spot where I am working such that I screw things up further down the curvature lay.
 |
| Through the looking glass. |
Most often, if I'm working from table to tip, I don't want to touch anything to the right of the marking in the picture below, as I've already gotten that perfect (actually, I usually get close and then go back over the whole piece with really fine paper). But I still need a way to keep track of my progress.


 |
| The pencil mark shows me where I need to remove material. |

The first markings (corresponding to the side mark) have been sanded off and the second marking (higher up) isn't completely removed. I re-measure, and if necessary, remark and do it again. It is also possible to place masking tape over the part of the piece that has been finished. That way, there is no chance of taking a swipe on the sandpaper that changes the finished part.

This Goldentone had a big problem with the rails being uneven from side-to-side. If I just place one rail on the sandpaper, I can work one side down, but that will actually put a "tipped" surface on that rail because one rail will be "up" on the paper and other rail is "down" on the glass surface. It is a tiny difference, but a blade-style feeler gauge will only measure the highest side of a rail (in this case, it would be on the outside of the rail) while the reed might actually sit towards the inside of the rail. Here is one way to reduce the problem of "canting" the mouthpiece rail when removing material from just one side rail.

You can also remove more material from one rail by putting more pressure on that rail during the drawing process, or draw the piece in an arc so that the high-side rail travels a longer distance and is therefore reduced more. But when one rail measures perfect, it gets put on the upside down paper so that I can't possibly remove more material on that side while removing material from the other rail.
Here's the newly reworked curve compared to the computer generated Link 7* line. The lay could be improved, but remember, I could also make it worse. When I'm this close, it's time for a play test and forget about graph points.


 I have a lot of material to remove, so I'm using a riffler file.
 There was a strange sharp mold line inside at the bottom of the chamber (under the end of the window) that I decided to smooth out. I'm not anal about the baffle being perfectly symmetrical, but sharp mold lines must go!

This is probably the best picture I can get of it. It's the darker spot right at the end of the chamber. The light reflection shows that after the initial rollover, the baffle is very flat, except for a dimple at the bottom of the reflection right before the shank bore. Anyway, I used my curved riffler to accentuate the dimple and eliminate the tiny mold line at the end of the chamber and start of the shank bore.
Here's the newly reworked curve compared to the computer generated Link 7* line. The lay could be improved, but remember, I could also make it worse. When I'm this close, it's time for a play test and forget about graph points.

Time to work on the innards. The first thing that needs to be done is to fix the really thick tip rail that was created by opening up the piece. I usually do that in several steps rather than all at once after the lay curvature is completed. In fact I always do the vast majority of the baffle work before finalizing the tip. Here's what the fat tip looks like with the increased tip opening almost finished. Yikes.
Notice that the inside arc of the tip rail is not perfectly symmetrical. This piece had no chamber work done by the manufacturer after molding (which is why the piece is inexpensive), and the molding process is never perfect. But the exact same thing happens on hand worked pieces. They can be made to look perfect at the tip rail, but they are not really perfectly symmetrical further in on the baffle, nor do they need to be. Why would a mouthpiece that is perfectly symmetrical play better? If it bothers you, you can "fix" it. But keep in mind the story of the Princess and the Mouthpiece.
 I have a lot of material to remove, so I'm using a riffler file.
 There was a strange sharp mold line inside at the bottom of the chamber (under the end of the window) that I decided to smooth out. I'm not anal about the baffle being perfectly symmetrical, but sharp mold lines must go!
This mouthpiece has a very deep baffle characteristic that I think is common with plastic pieces like Brilharts, but I've also seen it when examining old hard rubber Tone Edges. It's so far into the piece that I'm not even sure you can call it part of the baffle.

 Here I'm doing a final on the start of the baffle using an Exacto knife. I know the blade looks cruddy, but I just sharpened it and I couldn't find my new ones for a picture. I can draw it across the baffle using it as a scraper and it smoothly removes material and polishes the baffle. This also works nicely on hard rubber pieces. The angle shown is actually too shallow and would likely produce squeaks, but you get the idea. Notice the "purple" look of the shavings compared to the black plastic.
That's getting close to final. Then I do a final step that isn't necessary. I have a tiny abrasive gun that I can use to shoot different media though and clean up all of the tiny scratches, file marks, etc. If you go back and look at the pictures where I was marking the rails with a pencil, you can see the effect of my coarsest media (actual sand). A milder media produces the effect shown below.

 As a final step, I burnish the tip and rails on the smooth glass top of the bench. Take one nice smooth pull and look at the rails under magnification. If they are uneven side-to-side, it will show as one side of a rail polished smooth and the other side of the same rail still dull from the 1500 grit paper. If you have been careful, burnishing will not affect your Brand numbers. It simply perfects the curve. How's that? Well, here's my theory.
The final graph curve looks nice and smooth, because the computer graphing program averages the measured points to artificially produce a smoother curve, but it's not ever going to be a true representation of the lay. Think about it. The lay could be a series of 12 flat planes, with each feeler gauge measuring the center of the plane, and the computer program would artificially smooth the number series to make it look like a perfect arc.
As you smoothly draw the mouthpiece across the sandpaper using the professional refacer's super-secret magic wrist motion (not discussed here), you have greatly reduced the possibility of 12 flat planes. But it is possible that the actual curve is not as beautiful as the computer generated graph line implies. I could A) use every feeler gauge in the set and graph all of those hundreds of numbers, or B) use the flat surface of my bench to burnish out any microscopic imperfections. I choose B. I pull the rails back and forth over the smooth glass until the rails and tip are shiny, thus smoothing out any imperfections.
So there you have it. A "free" hot rodded Goldentone with a .111 tip, ported and polished. How does it play? Better than your expensive mouthpiece. No way, you say! Don't worry, mine still has one huge unforgivable flaw on the outside. It says Selmer Goldentone on it.

So there you have it. A "free" hot rodded Goldentone with a .111 tip, ported and polished. How does it play? Better than your expensive mouthpiece. No way, you say! Don't worry, mine still has one huge unforgivable flaw on the outside. It says Selmer Goldentone on it.

I think I can fix that. In fact, I did in a later blog.
Thanks. I found that reading your in-depth guide on mouthpiece modifications extremely helpful. It is very rare to find this kind of information on the Web. I have followed your advice and given this a try on a cheap chinese stock plastic alto sax piece. It was a large round chamber piece with no tip size information. I am a retired engineer with very good craft skills, so I could understand your objectives perfectly. Working on plastics/hard rubber is a lot easier than brass, although, a superior finish can be achieved on brass, it's just the plating process which would require expensive equipment/material.
ReplyDeleteI really like your attitude, and agree with you totally, that there is no magic secrets. Bird must of used whatever he could get his hands on, and he would still be able to get the audience jumping. I also agree with you about the 'brand snob' scenario. My late father played a Conn chu berry in numerous dance bands often as lead. He never had the money to use a tech and never had the skills to carry out refined work (he was a bricklayer) he would always use elastic bands in place of broken springs and I've seen those elastics snap off during a stand up solo! He would always get reeds to play to his liking with the use of a razor blade.
I have a Buescher true tone 1928 alto, my son gave me which he salvaged from a waste disposal site (he works for) the original case and a selmer c* metal soloist, (1950's). Both excellent condition now I have cleaned them up and did some low register key cup re alignment. Plays sweet and mellow. I bought Gear4music cheap chinese tenor and alto Yanigasawa copies and they are great. Recently bought brand new half price Otto Link tenor NY STM 7 from amazon warehouse returns, very slight window imperfection, but it plays fantastic, and makes a good cheap chinese yani copy tenor sax sound like a pro!
Going back to my chinese stock alto mouthpiece, after some rework it plays much better.
Thanks again for your (secrets)
Glad that you liked it. We have a hard time closing out eyes and opening our ears when it comes to mouthpieces. I'm guilty of it. Last week, I took out my white no name piece discussed in the Lester Young blog and played it again. Turns out I took it out with me that night and left the expensive pieces at home.
DeleteThis blog site keeps track of hits on this article based on the country of origin. For some reason it had the largest viewing and comments from Russia, later followed by Portugal. There are still more hits from Russian and Portuguese speaking sites than U.S. sites. I struggled a bit with Google Translate, but I understood that the ability to modify inexpensive student pieces was well received in some countries.
I thank you sir for a very insightful and in depth, well thought out and beautifully photo'd article. I hope to one day try and process your skills. Thanks!
ReplyDeleteThanks. Don't pay too much for your materials, including the "blank" that you choose to modify. The price of an old generic hard rubber mouthpieces has skyrocketed. I'm no longer even buying them. At $15, an old mouthpiece is an okay project. At $150 (because it's supposedly rare), it's not worth it. Good luck.
ReplyDeleteWhat about the cheap Chinese brass mouthpieces? The new ones are CNCd to pretty precise numbers, and you only have to remove a little material to get good results. They can be found for 15-40$ with ligature and cap. They are usually nickeled and then gold plated, with a thin lacquer.
DeleteThanks for this very details article, wish I found this article 6 month early. When I saw that digital tyre gauge, wow that's exactly what I am using. That digital gauge was really handy but would be better if you can sharpen the end (I have no luck removing it)
ReplyDeleteAnyway I mod 3 Chinese metal mouthpiece so far (Reface and enlarge the chamber). They all sound fantastic.
Can you point me to the right direction where I can get the glass gauge.
Thanks
leo,
DeleteLook closely at my digital tire gauge (click on the picture). You can see that I rounded off the end so that it touches the tip at only one place. Because the gauge can (and should) be set to zero before each measurement, simply rounding off the end is sufficient to get accurate readings. No need to have a sharp point.
As I noted, tip openings are largely meaningless, but like the color of an automobile, it is what many people notice first. Using feeler gauges will get you close enough. When the lay is a smooth curve all the way to the tip, the actual opening size (within reason) doesn't really matter. Who cares whether it is .082 or .086? In fact, people may be better off if they didn't know the tip opening on mouthpieces. Play what works best for you, not the tip size.
All of the glass gauges that that I have seen that are now available will provide you with less accurate readings than the .5 mm mechanic's ruler shown in the article. I know, glass is traditional. I have no idea why. It's like having to buy a camera instead of just using your phone. Old school thinking. I'm all for tradition, but not when it costs more and gives no more accurate results. The ruler shown in the picture costs $10, including shipping (from Ebay). A glass ruler, if you can find one, will cost you several times more (if you can find one).
Thanks for the reply. I have to agree with you, I too don't care too much about actual reading of the tip opening, as long as the left and right rail are levelled.
ReplyDeleteThere aren't a lot of sax supply here in Australia, so I have improvise a lot with what ever tools I can find (However, I would like to get one of those glass ruler, as I think might be easier to align the mouthpiece). Instead of using the feeler gauge, I have measure my rail with the digital tyre gauge. Plot the graph in excel, then smooth out the facing curve. It is a tedious process, but I am very happy with the result so far.
The way I use my tyre gauge is, I have drill a tiny hole in the centre of my metal ruler, then super glue the gauge on top(of course need to set the zero after that). I might go get a set of feeler gauge today and make some finer adjustment. Once again, thanks for all the info.
I just did two web searches. Mechanic's stainless steel .5mm end indexed rulers are now available on Ebay for $2, including shipping. If you search for a "Theo Wanne glass gauge," you will find a product for about $20 US (plus shipping) that is made of glass. If you drop them, one will perform like traditional glass (i.e., break). The stainless ruler is laser etched in Brand increments (.5mm increments). The glass one is marked in 2mm increments (what!!!) with thick lines, meaning that the glass ruler will give traditional readings (i.e., less accurate). But wait, there's more. Unlike a mechanic's ruler, the glass ruler is not end indexed. That means that you get the additional error, as discussed in the blog, that is not included with a traditional glass ruler. Bonus!
DeleteSo glass rulers are still available for those who want to spend more for less accuracy in order to be traditional. Just saying.
I'm going to get my feelers and check a no name mouthpiece that came with a horn I bought awhile back, hell might just check all my pieces. I don't know if I want to try refacing them, but measuring doesn't hurt. Thanks for the article.
ReplyDeleteI just finished a project that might interest you. Measure your favorite piece and put that lay on the no name piece, assuming the tip opening is larger on your main piece. Working the baffle will probably take the most time. But a no name piece hasn't much value and what you will learn has tremendous value.
DeleteI just had some fun with a no name piece and not mapping much. Just mouthpiece and sand paper. I would guess that's probably about all there was when single reed mouthpieces first started. The worst that can happen is tossing a $15 mouthpiece.
What exactly did you use to smooth the inside of the mouthpiece? I looked up air compressors (guessing that’s what you used) on Amazon and a portable one is listed reasonably around $20-$40 but I want to make sure of what I’m buying and how to use it. If you could just tell me what you used and how you used it, I would greatly appreciate it. Thanks to you and this blog, I took an unplayable metal Brilhart 3 tenor (medium-high baffle, small chamber) and did everything as you said, minus the measuring, however. Me being the impatient high school senior, I’m still waiting for the glass gauge by Theo. I now regret that purchase after reading the comment section of this blog. Anyways, I did everything purely based off of feel and my naked eyes. After getting a more open facing, I took a rotary tool and shaved the inner side walls until they were thin to my liking. I also cut out a “secondary window” of which Jody Espina has a patent for, thinking I would get more out of the reed and even more depth, thinking to myself that since this secondary window is right above the chamber, it could also act as a larger chamber. Just me doing some creative thinking. Right or wrong, I was extremely happy in the end. I then re-sanded the table and rails to get rid of any imperfections, then opened the tip to my preference. I sanded the baffle and inner side walls with 1200 grit on my pinky to get the inside and smooth. Believe it or not, there’s “no” tip rail haha. After I was convinced that she was ready to play, I tried it out and, OH MAN what a beast. Even response throughout all registers and fantastic altissimo, just a real power house that I’m really excited to continue to play. This is now the piece I use when I occasionally accompany Blue Hwy (LOOK THEM UP!!!), a blues band that features an absolute killer tenor saxophonist, Roger Ehrnman, who plays a Jody Jazz DV8. Thanks again for revealing your “secrets”, I look forward to your response!
ReplyDeleteMy "air compressor" is a commercial unit. My sand blasting gun is just a little gravity feed pistol like this one.
Deletehttps://www.harborfreight.com/21-oz-hopper-gravity-feed-spot-blaster-gun-95793.html
The sandblasting is primarily cosmetic. Actual sand will leave a rough finish (on hard rubber) and probably isn't best from the point of hygiene. I don't know if it will do much on a metal piece.
If and when you do measure your facing curve, it might not be numbers that look good on a graph. Then you have to decide whether to "fix" some spots or leave it alone. Remember, you can always make it worse.
Any advice for removing chamber material? I'm having trouble figuring out a method that would most effectively remove as much material as possible from the chamber of a hard rubber Meyer. I reread part 2 of this blog and came to the conclusion that I should just purchase the sand blasting gun that you have and use the most abrasive material through the shank of the mouthpiece, aiming it at the chamber while I protect the baffle and rails with electrical tape. Please let me know if I am going in the right direction, thank you!
DeleteMy first question would be why are you removing "as much material as possible from the chamber of a hard rubber Meyer"? The chamber shape is what makes a Meyer a Meyer. If you want a large chamber hard rubber piece, start with a large chamber piece. So the simple answer would be to remove the material in the molding process, i.e., start with a different (large chamber) piece. See my blog on making an Otto Link Slant Signature for some choices for vintage large chamber rubber pieces that can be modified.
DeleteUsing sand blasting equipment would not be an effective way to enlarge a chamber. Sand blasting hard rubber is ineffective, in fact, rubber is often used for masking work when abrasive blasting. Blasting can clean up (or hide) the scratches made from sand paper, but it is inefficient and inexact for the removal and shaping of hard rubber.
If I needed to remove a large amount inside the chamber, I'd go with gluing waterproof sandpaper to something that approximated the shape I was trying to accomplish. Use plenty of water to wet sand and keep the paper from loading up. Sometimes you can find a variety pack that would have the right paper (something like 100, 320, 400, 600). If you move directly from something like 100 to remove material then 400 to polish out the scratches, it will take days.
I would stay away from trying electric tools unless you have a good drill press and vice table. Just sticking something inside (like a Dremel bit), will likely make a lop-sided gouged up mess that will be difficult to clean up.
I’ve been working with whatever I can get my hands on without spending a whole lot of money. I appreciate your response and just wanted to make it known that while I am learning about refacing from many resources, I get experimental on pieces that I can afford to screw up/ ruin.
DeleteTry this Clayton, find yourself a round plastic rod (used ball pen). wrap the end with some masking tape (around 1.5 -2 cm wide) to build the thickness. Use some double side tape to attache some sand paper strip at then end. You can now attached this to your electric drill.
ReplyDeleteI just refaced a plastic Brilhart Ebolin Special using your methods. It plays very nicely! A little bright and focused for my tastes, but it is certainly a decent piece now. Thank you for sharing the information - this is great stuff.
ReplyDeleteThanks, but it's not "my method" Its just how mouthpieces are hand finished. Many modern pieces, like the Ebolin Special, are no longer hand finished and can be improved. Plus, the Ebolin Special is only available in one lay/tip opening. If you want something different, you have to do it yourself. The sound from the Eboline flat sidewall chamber will not change that much. For a less bright sound, you might get lucky and find a different brand/strength of reed that gets you the rest of the way.
ReplyDeleteNice articles and your information valuable and good articles thank for the sharing information Grit Blasting
ReplyDelete